Sunday, 30 December 2012

How to use style sheets in HTML Tables

<html>
<body style="background-color:yellow;">
<table border="1">
<tr>
  <td>
   <p style="background-color:green;">This is a paragraph</p>
   <p style="background-color:green;">This is another paragraph</p>
  </td>
  <td>This cell contains a table:
   <table border="1">
   <tr>
     <td>A</td>
     <td>B</td>
   </tr>
   <tr>
     <td>C</td>
     <td>D</td>
   </tr>
   </table>
  </td>
</tr>
<tr>
  <td>This cell contains a list
   <ul>
    <li>apples</li>
    <li>bananas</li>
    <li>pineapples</li>
   </ul>
  </td>
  <td>HELLO</td>
</tr>
</table>

</body>
</html>

Friday, 28 December 2012

How to create table in HTML

Nowadays, I am doing HTML in which I am learning to make tables. Here is the following example:

<html>
<head>
<title>Table1</title>
<head>
<body>
<table border="2" width="100%">
<tr>
<td colspan="4" align="center">Header</td>
</tr>
<tr>
<td>Home</td>
<td>About Us</td>
<td>Gallery</td>
<td>Contact Us</td>
</tr>
<tr>
<td colspan="4">
<table>
<td>Categories</td>
<td>
<table>
<tr><td><h1>Welcome to BTES</h1></td></tr>
<tr><td><p>bebo Technologies Pvt. Ltd., an ISO 9001:2008 compliant company, has now
 emerged into providing practical training on various software technologies under 
 the banner of bebo Technical Education Services (BTES).<br>

BTES focuses on strategic and practical approach in providing training to students
 and working professionals. Under the close guidance and supervision of our experienced
 professionals, you will be trained on various technical aspects to tackle industry challenges
 faced regularly in your professional life.<br>

Our courses cover everything necessary to build a strong professional
 foundation. Through our courses, which are developed by industry experts,
 we bring their learning and experience to you so that you excel in your professional life.
 This brings you at par with working professionals and thus, meet the industry expectations. 
 </p></td></tr>
 </table>
 </td>
 </table>
 </tr>
 <tr>
 <td colspan="4" align="center">Footer</td>
 </tr>
 </table>
 </body>
 </html>

Saturday, 15 December 2012

Examples that are used to access data from sql server

6 Queries that are used to access data from sql server.
Table:1
/*    Ist  Table Name: T_STUDENT       */
CREATE TABLE T_STUDENT
(
STUDENT_ID int identity,
STUDENT_NAME varchar(200),
DOB varchar(50),
CITY_ID int
)
STUDENT_ID     STUDENT_NAME     DOB     CITY_ID

 SELECT * FROM T_STUDENT


STUDENT_ID     STUDENT_NAME        DOB                   CITY_ID

1                           jeenu utreja                    15/09/1991                    
2                           divya verma                   08/02/1992
3                           khushboo medhavi        06/08/1990
4                           jyoti gauri                        26/05/1986
5                           neha                                12/06/1986
Table:2
2.) Code for Creating Second Table in SQL:


/*    2nd  Table Name: T_STUDENT_PHONE       */


CREATE TABLE T_STUDENT_PHONE
(
PHONE_ID INT IDENTITY,
STUDENT_ID INT,
PHONE_TYPE INT,
PHONE_TEXT VARCHAR(40),
)
PHONE_ID
STUDENT_ID
PHONE_TYPE
PHONE_TEXT

 SELECT * FROM T_STUDENT_PHONE
            
    
PHONE_ID
STUDENT_ID
PHONE_TYPE
PHONE_TEXT
1                                 1                                       1                                        7676876772
2                                 1                                       2                                        9988676578       
3                                 2                                       3                                        9877676776
4                                 2                                       4                                        9865455676
5                                 3                                       1                                        9776666777
6                                 3                                       2                                        9776677776

Table:3
3.) Code for Creating Third Table in SQL:

/*    3rd  Table Name: T_STUDENT_PHONE_TYPE       */


CREATE TABLE T_STUDENT_PHONE_TYPE
(
PHONE_TYPE INT IDENTITY,
PHONE_TYPE_TEXT VARCHAR(50)

)
PHONE_TYPE         PHONE_TYPE_TEXT


SELECT * FROM T_STUDENT_PHONE_TYPE 


PHONE_TYPE         PHONE_TYPE_TEXT
 1                                Home No.
 2                                Mobile No.
 3                                Mother Mobile No.

Table:4
4.) Code for Creating Fourth Table in SQL:
/*    4th  Table Name: T_STUDENT_CITY      */
CREATE TABLE T_STUDENT_CITY
(
CITY_ID INT IDENTITY,
CITY_NAME VARCHAR(200)
)
CITY_ID                   CITY_NAME 
 
SELECT * FROM T_STUDENT_CITY
 
CITY_ID
CITY_NAME 
130                            Rajpura


131 Chandigarh
132 Ambala
133 Patiala


Saturday, 8 December 2012

Features available in .NET Framework 2.0

In .NET Framework 2.0 varius aspects that support for 64 bit platform application development, Access control list support(ACL), ADO.NET, ASP.NET, Authenticated streams, Console class Additions, Data Protection API, Distributed computing, EventLog Enhancements, FTP Support, Generics and Generic Collection, I/O Enhancements and several other features are discussed.
The Microsoft .NET framework of version 2.0 extends the .NET framework of Version 1.1. Various user interface types such as Windows forms, ASP.NET and the compact framework. It also includes the official languages C#, Visual Basic, .NET and J# and the development environment. We shall also focus on the main changes brought into the .NET framework by the 2.0 version.
Support for 64 bit platform application development: These applications can run faster and take advantage of more memory that is available and users can build managed code libraries or easily use unmanaged code libraries on 64 bit machines. 
ADO.NET: It also supports user defined types, asynchronous database operations, XML data types, large value types, snapshot isolation, and has attributes that allow applications to support multiple active result sets with SQL Server 2005. 
ASP.NET: It has received more attention. A number of features have been added to ASP.NET such as new controls for development of dynamic web pages. New Data controls for displaying and editing data that do not require the user to write code add to the ease of application development. The website can be precompiled to produce an executable code from source files.
Authenticated streams: It is the new class introduced into the .NET Framework to enable users transmit secure information between a client and server.These stream classes support mutual authentication, data encryption and data signing.
Console Class Additions: This is extremely useful for creation of animations which require moving a rectangular area of the screen buffer.
Debugger Display Attributes: The user can now identify the most useful information that user needs to display in the debugger and make the required settings for the same.


Friday, 7 December 2012

Introduction to ASP.NET

ASP.NET is the next version of Active Server Pages. It provides unified web development model that includes the services neceesary for developers to build enterprise-class web applications. As ASP.NET syntax is compatible with ASP, it also provides a new programming model. ASP.NET is a compiled, and .NET-based environment, we can author applications in any .NET compatible language including Visual Basic .NET, C#, and JScript .NET. Developers can use Web Forms or XML Web services when creating an ASP.NET application. ASP.NET provides a simple model that enables Web developers to write logic that runs at the application level. Developers can write this code in the Global.asax text file or in a compiled class deployed as an assembly. This logic can include application-level events, but developers can easily extend this model to suit the needs of their Web application. For more information, see ASP.NET Applications.

ASP.NET page life cycle:

When ASP.NET page runs, the page goes through a life cycle in which it performs series of steps. It is important for us to understand the page life cycle so that we can write code at the appropriate life-cycle stage for the effect that we intend. The life cycle of a control is based on the page life cycle, and the page raises many of the events that we need to handle in a custom 
control. It includes various stages like:

  1. Page Request: It occurs before the page life cycle begins.
  2. Start: In the start stage, page properties such as response and request are set.  
  3. Initialization: During page initialization, controls on the page are available and each   control's UniqueID property is set.
  4. Load: During load, if the current request is a postback, control properties are loaded with information recovered from view state and control state.
  5.  Unload: The Unload event is raised after the page has been fully rendered, sent to the client, and is ready to be discarded.


Thursday, 6 December 2012

Definition of Java Database Connectivity

JDBCT is a JavaT API executing statements. It consists of classes and interfaces that are written in java programming language. Using JDBC it is easy to send SQL statements to any relational database. The combination of java and JDBC lets us to write it once and run it anywhere. As java is secure, robust, easy to use, easy to understand, and automatically downloadable on a network is an excellent language for database applications. JDBC extends what can be done in java. With java and JDBC API we can publish a web page containing an applet that uses information obtained from a remote database.

Advantages of JDBC:

  1. JDBC establishes a connection with a database.
  2. JDBC sends SQL statements.
  3. JDBC also processes the results.
Java soft provides three JDBC product components as part of Java developer's kit(JDK):
  1. the JDBC drive manager.
  2. the JDBC driver-test suite.
  3. the JDBC-ODBC bridge.
The JDBC driver manager is the backbone of the JDB architecture. It's actually quite simple and small. It's primary function is to connect java applications to correct JDBC driver .
I have made a project on the CONTACT MANAGEMENT SYSTEM in which I used JDBC-ODBC database connectivity and it's syntax is as follows:
con = DriverManager.getConnection("jdbc:odbc:sampledatabase");
 

Tuesday, 4 December 2012

How to use NetBeans in Java

The NetBeans IDE is open source and is written in JAVA programming language. It provides services common to creating desktop applications- such as window and menu management, setting storage -- and is also the first IDE to fully support JDK 5.0 features. The NetBeans platform and IDEare free for commercial and non-commercial use, and they are supported by
Sun Microsystems. It can be downloaded from http://www.netbeans.org/  

1. Using NetBeans:

To be able to successfully build programs it is recommended to follow the
intended procedure.
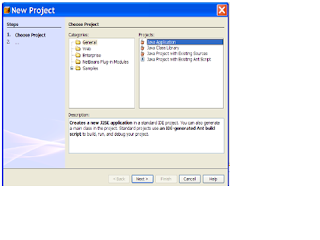
First it’s important to create a new project. Various project types are available;
however in this case the intended type will be Java Application.

 
 We change the name of the project to something of this sort: unit_1. Usually it is also a good idea to set up the location in which to store the projects and future work in a well known directory. Here the chosen location is: netbeans_home/workspace. To keep control over the way that classes (e.g. the main launching class) are defined it is recommended to untick
the two check boxes displayed in above figure.


After Finish is clicked the new project structure will be in place, however we
now need to extend this by adding a new package. In this manner classes
associated with the same topics can be stored in one package. The end result
will be multiple packages in one project, each having a number of classes
(programs). The process is simple, just rt-click on the Source Package label in
NetBeans’ Projects tab and click
New ->Java Package.

In this tutorial we will label the package exercises. Clicking Finish will
terminate this process.
Next we will create a simple class example and store it within our newly
created package. 


This process is very straight forward and involves a rt-click on the
appropriate exercises package, after which we choose Java Class. 
Set the class name to Welcome. The other details can be checked to verify that
all is as intended.
 

The new class structure will be generated and at this point we need to edit the
code and add the necessary lines. Note that the first line of code is referring to
the package name in which this class will be stored.
The code is missing a main method (since we un-checked the checkbox
previously), which we add. Within this method we also need to add the line:

System.out.println(“Welcome to Java”); 
 
Notice that while adding this line of code NetBeans’ editor will be suggesting
stuff to make our lives easier. The next step is to either save, compile and
execute our program, or else execute it directly (which will automatically save
and compile). 
Any output from the executed program will be displayed in the terminal
window. In the above example the program executed correctly and the
intended message “Welcome to Java” displayed. If some compile time and
runtime errors were encountered, the appropriate exception message would
have also been displayed in this window.