Sunday, 7 April 2013

About Wordpress

STEP 1:  Download wordpress from wordpress.org
STEP 2:  After finishing the download then extract the zip folder and keep it in xampp.
STEP 3:  Then open the browser and write localhost/wordpress/ and it displays as follows:


STEP 4:  Then click on the create a configuration file and it displays as:

STEP 5:  Click on Let’s go! Option. Then it displays a database name, username, password, database host, table prefix and a submit button. We have to create a database named as wordpress in phpmyadmin. Put username as root, password blank, database host as localhost and then click the submit button. It displays as:


STEP 6:   After we have submit the button then we have to click on Run to install. We have to install the wordpress . We have to give site title same as the project name, username as admin and has to give the user email id and click on install wordpress.
STEP 7:  After installing the wordpress then we have to login by putting username and password.

STEP 8:  If we have to apply themes then we have to click on appearance -> themes. And then install themes.


Sunday, 10 March 2013

How to register a form in a HTML Template


STEP 1: First of all select a HTML template.

STEP 2: Then make a registration form using the coding of an index page of the template. Coding is as follows:

<html>
<head >
<script type="text/javascript">
function validate()
{
if(document.getElementById('name').value=="")
{
alert("enter name");
document.getElementById('name').focus();
return false;
}
if(document.getElementById('email').value=="")
{
alert("enter email");
document.getElementById('email').focus();
return false;
}
return true;
}
</script>
<title>Main Page</title>
<meta charset="utf-8">
<link rel="stylesheet" href="css/reset.css" type="text/css" media="all">
<link rel="stylesheet" href="css/layout.css" type="text/css" media="all">
<link rel="stylesheet" href="css/style.css" type="text/css" media="all">
<script type="text/javascript" src="js/jquery-1.6.js" ></script>
<script type="text/javascript" src="js/cufon-yui.js"></script>
<script type="text/javascript" src="js/cufon-replace.js"></script>
  <script type="text/javascript" src="js/Didact_Gothic_400.font.js"></script>
<script type="text/javascript" src="js/jquery.nivo.slider.pack.js"></script>
<script type="text/javascript" src="js/atooltip.jquery.js"></script>
<script type="text/javascript" src="js/jquery.jqtransform.js" ></script>
<script type="text/javascript" src="js/script.js"></script>
<script type="text/javascript" src="js/jquery.easing.1.3.js"></script>
<!--[if lt IE 9]>
<script type="text/javascript" src="js/html5.js"></script>
<style type="text/css">
.bg{ behavior: url(js/PIE.htc); }
</style>
<![endif]-->
<!--[if lt IE 7]>
<div style=' clear: both; text-align:center; position: relative;'>
<a href="http://www.microsoft.com/windows/internet-explorer/default.aspx?ocid=ie6_countdown_bannercode"><img src="http://www.theie6countdown.com/images/upgrade.jpg" border="0"  alt="" /></a>
</div>
<![endif]-->


</head>

<body id="page1">
<div class="body1">
<div class="main">
<!-- header -->
<?php include("include/header.php");?>
<div class="wrapper">

<!-- content -->
<div class="body2">
<div class="main">
<section id="content">
<div class="wrapper">
<article class="col1">
<div class="pad2">
<table align="100%" align="center">
<tr>
<td colspan="3"><h2 align="center">Registration Form</h2>
<form name="Registration" action="" method="post" onsubmit="return validate()">
<table border="0" width="100%" align="center">
<tr>
<td>&nbsp;&nbsp;&nbsp;Name:</td><td><input type="text" name="name" id="name" size="20"></td>
</tr>
<tr height="22">&nbsp;</tr>
<tr>
<td>&nbsp;&nbsp;&nbsp;Uname:</td><td><input type="text" name="uname" id="uname" size="20"></td>
</tr>
<tr height="22">&nbsp;</tr>
<tr>
<td>&nbsp;&nbsp;&nbsp;Email:</td><td><input type="text" name="email" id="email" size="20"></td>
</tr>
<tr height="22">&nbsp;</tr>
<tr>
<td>&nbsp;&nbsp;&nbsp;Password:</td><td><input type="password" name="password" id="password" size="20"></td>
</tr>
<tr height="22">&nbsp;</tr>
<tr>
<td>&nbsp;&nbsp;&nbsp;City:</td>
<td>
<select name="city" >
<option value="PS">Please Select</option>
<option value="Rajpura">Rajpura</option>
<option value="Jaipur">Jaipur</option>
<option value="Haridwar">Haridwar</option>
<option value="Shimla">Shimla</option>
</select>
</td>
</tr>
<tr height="22">&nbsp;</tr>
<tr>
<td>&nbsp;&nbsp;&nbsp;State:</td>
<td>
<select name="state" >
<option value="PS">Please Select</option>
<option value="Punjab">Punjab</option>
<option value="Jaipur">Rajasthan</option>
<option value="Uttranchal">Uttranchal</option>
<option value="Himachal Pradesh">Himachal Pradesh</option>
</select>
</td>
</tr>
<tr height="22">&nbsp;</tr>
<tr>
<td>&nbsp;&nbsp;&nbsp;Status:</td>
<td><input type="radio" name="status" value="married" >Married
<br><input type="radio" name="status" value="unmarried" >Unmarried</td>
</tr>
<tr height="22">&nbsp;</tr>
<tr>
<td>&nbsp;&nbsp;&nbsp;Education:</td>
<td><input type="checkbox" name='education' value="BCA" >BCA
<input type="checkbox" name='education' value="MCA" >MCA<br>
<input type="checkbox" name='education' value="B.TECH" >B.TECH
<input type="checkbox" name='education' value="M.TECH" >M.TECH
</td>
</tr>
<tr height="22">&nbsp;</tr>  
<tr>
<td>&nbsp;&nbsp;&nbsp;Address:</td>
<td><textarea  name="address" rows="4" cols="23" ></textarea></td>
</tr>
<tr height="22">&nbsp;</tr>
<tr>
<td></td>
<td><input type="submit" name="submit" value="submit" class="button"></td>
` </tr>
</table></form>
</td>
</div><br><br><br><br>
<!--<td align="right">
<form id="form_1" method="post">
<table width="100%" border="0" align="center" cellspacing="10" cellpadding="11" align="right">
<tr>
<td colspan="2" align="center"><img src="images/imagesn.jpeg" height="150" width="150" ></td>
</tr>
<tr>
<td colspan=2 align="center"><h2 class="pad_bot1">Login</h2></td>
</tr>
<tr>
<td>&nbsp;&nbsp;&nbsp;Username:</td>
<td><input type="text" name= "username" size="15"></td>
</tr>
<tr height="22">&nbsp;</tr>
<tr>
<td>&nbsp;&nbsp;&nbsp;Password:</td>
<td><input type="password" name= "password" size="15"></td>
</tr>
<tr>
<td> </td>
<td><input type="submit" name="submit" value="Login" class="button"></td>
</tr>
</table>
Know exactly what you want? <br>
Try our <a href="#">Advanced Search</a>
</div>
</form>-->
</article>
</div>
</td>
</tr></td>
</table></table>
<div class="wrapper">
<article class="col1">
<div class="pad_left1">
<h2 class="pad_bot1">Buyers. Sellers. Proprietors. Agents.</h2>
<div class="wrapper">
<article class="cols">
<h4 class="img1">Selling</h4>
<p class="pad_bot1"><strong class="color1">Welcome one of <br>
<a href="http://blog.templatemonster.com/free-website-templates/" target="_blank">free website templates</a></strong></p>
<p class="pad_bot2">
created by TemplateMonster.com team, optimized for 1024X768 px.</p>
<a href="#" class="button">Read more</a>
</article>
<article class="cols pad_left1">
<h4 class="img2">Investing</h4>
<p class="pad_bot1"><strong class="color1"><a href="http://blog.templatemonster.com/2011/10/10/free-website-template-slideshow-real-estate/" target="_blank" rel="nofollow">Free website template</a> for<br>
Real Estate business</strong></p>
<p class="pad_bot2">
goes with PSD source files and without them.</p>
<a href="#" class="button">Read more</a>
</article>
<article class="cols pad_left1">
<h4 class="img3">Renting</h4>
<p class="pad_bot1"><strong class="color1">Template has several pages</strong></p>
<p class="pad_bot2">
<a href="index.html" class="color2">Main</a>, <a href="Buying.html" class="color2">Buying</a>, <a href="Selling.html" class="color2">Selling</a>, <a href="Renting.html" class="color2">Renting</a>, <a href="Finance.html" class="color2">Finance</a>, <a href="Contacts.html" class="color2">Contacts</a> (note that contact us form – doesn’t work).</p>
<a href="#" class="button">Read more</a>
</article>
</div>
</div>
</article>
<article class="col2">
<div class="pad1">
<h3>Special Offers</h3>
<ul class="list1">
<li><a href="#">Home Loan Offer</a></li>
<li><a href="#">Free Calculators</a></li>
<li><a href="#">Free Loan Tools</a></li>
<li><a href="#">Value Your Home</a></li>
<li><a href="#">Recently Sold Properties</a></li>
<li><a href="#">Suburb Statistics</a></li>
<li><a href="#">Compare Property Prices</a></li>
</ul>
</div>
</article>
</div>
</section>
</div>
</div>
<div class="body3">
<div class="main">
<section id="content2">
<div class="wrapper">
<article class="col1">
<div class="pad2">
<h2>Remodeling Rooms</h2>
<div class="wrapper pad_bot3">
<figure class="left marg_right1"><img src="images/page1_img4.jpg" alt=""></figure>
<p class="pad_bot1"><strong class="color2">2006, 3 baths, 6 beds, building size: 5000 sq. ft.<br>
Price: <span class="color1">$ 600 000</span></strong></p>
<p class="pad_bot2">
Massa dictum ementum velitumo od consequat ante oremsumas ame consectetueraipiscing eliteli ueedlorAliquam conguen nisauris accusalla vel deinol tincidunt ligula magna semper ipsum.</p>
<a href="#" class="button">Read more</a>
</div>
<div class="wrapper">
<figure class="left marg_right1"><img src="images/page1_img5.jpg" alt=""></figure>
<p class="pad_bot1"><strong class="color2">2006, 3 baths, 6 beds, building size: 5000 sq. ft.<br>
Price: <span class="color1">$ 600 000</span></strong></p>
<p class="pad_bot2">
Massa dictum ementum velitumo od consequat ante oremsumas ame consectetueraipiscing eliteli ueedlorAliquam conguen nisauris accusalla vel deinol tincidunt ligula magna semper ipsum.</p>
<a href="#" class="button">Read more</a>
</div>
</div>
</article>
<article class="col2">
<div class="pad1">
<h3>Recent News</h3>
<div class="wrapper">
<span class="date"><strong>28</strong><span>may</span></span>
<p><a href="#" class="color2">Donec consequat risus</a><br>
Hendrerit conghdim entum diam metus fringilla nisl, in porta sapien purus quis odiosem... <a href="#">more</a></p>
</div>
<div class="wrapper">
<span class="date"><strong>25</strong><span>may</span></span>
<p><a href="#" class="color2">Nullam dignissim</a><br>
Laoreet neque, quis sollicitudin orci tempus etiam viverra leo euismod pulvinar accumsan...   <a href="#">more</a></p>
</div>
<div class="wrapper">
<span class="date"><strong>22</strong><span>may</span></span>
<p><a href="#" class="color2">Quisque nunc lorem</a><br>
Feugiat nec sodales quis, iaculis sed libero. Cras vel nisl justo, ac posuere est nulla facilisi... <a href="#">more</a></p>
</div>
</div>
</article>
</div>
</section>
</div>
</div>
<!-- / content -->
<div class="body4">
<div class="main">
<!-- / footer -->
<?php include("include/footer.php");?>
<script type="text/javascript"> Cufon.now(); </script>
</body>
</html>

The output of the registration form is:

Monday, 18 February 2013

How to update/edit a data in database using Mysql

Step 1:  Make a file named edit.php

<?php
include("include/connection.php");
$id=$_GET['id'];
?>

Step 2:  Make a form according to insertion.

Step 3:  Above the form add a selection query using where condition. for e.g.:

$query="select * from register where id=". $id;

Step 4:  $result=mysql_query($query);

while($row=mysql_fetch_array($result))

{

$name=$row['name'];

$email=$row['email'];

}

if(isset($_POST['submit'])=='update')

{

$name=$_POST['name'];

$email=$_POST['email'];

$query_update="update register set name='$name',email='$email' where id=". $id;

Step 5:  Run the query 

$result_update=mysql_query($query_update);
if($result_update=='1')
{
header("location:selection.php");
}
else
{
echo"data not updated. Please try again";
}
}
?>
<html>
<head>
</head>
<body>
<form name="edit" action="" method="post" onsubmit="return validate()">
<table border="0" width="50%" align="center">
<tr>
<td>Name:</td><td><input type="text" name="name" id="name"value="<?php echo $name; ?>" size="20"></td>
</tr>
<tr>
<td>Email:</td><td><input type="text" name="email" id="email" value="<?php echo $email; ?>" size="20"></td>
</tr>
<tr>
<td></td>
<td><input type="submit" name="submit" value="update"></td>
</tr>
            </table>
</form>
</body>
</html>
Like this we can update the name and email of the person.

Sunday, 17 February 2013

How to insert data permanently in DB using Mysql

Step 1:   Create a HTML form using .php extension. for e.g.

<html>
<body>
<form name="Registration" action="" method="post">
<table border="1" width="50%" cell spacing="0" cell padding="0">
<tr>
<td>
<table>
<tr>
<td><h1 align="center">REGISTRATION</h1></td>
</tr>
<tr>
<td>NAME:</td>
<td><input type="text" name="name" size="20" id="name"></td>
</tr>
<tr>
<td>USERNAME:</td>
<td><input type="text" name="uname" size="20" id="uname"></td>
</tr>
<tr>
<td align="center"><input type="submit" name="submit" value="submit" ></td>
</tr>
</table>
</td>
</tr>
</table>
</form>
</body>
</html>

Step 2:  Create a database in PHPmyadmin.

Step 3:   Create a table in database.

Step 4:   Make a connection file in common file. for e.g.:
<?php
$conn=mysql_connect("localhost","root","");
if(!$conn)
{
die('couldnot connect:'.mysql_error());
}
mysql_select_db("online_property",$conn);
?>

Step 5:  

1.  Call a connection file on the top.

<?php include ("include/connection.php");

2.  if(isset($_POST['submit'])=='submit')

{

$name=$_POST['name'];

$uname=$_POST['uname'];

echo "You are".$name."".$uname."<br/>";

}

3. Add the insertion query for e.g.:

$query="insert into register(name,uname)value('$name','$uname')";

4. Run the query for e.g.: 

$result=mysql_query($query);

5. Then check the result if result is one then output is successfully register otherwise output is failed.

if($result=='1')

{

echo"Successfully Register";

}

else

{

echo"Registration failed. please try again";

}


?> 


Wednesday, 9 January 2013

Javascript validation for registration form

<html>
<head>
<title>REGISTRATION</title>
<style>
.margin
{
margin-top:100px;
margin-bottom:100px;
margin-left:150px;
margin-left:150px;
}
</style>
<script type="text/javascript">
function validate()
{
if(document.getElementById('name').value=='')
{
alert("please enter a name");
document.getElementById('name').focus();
return false;
}
if(document.getElementById('username').value=='')
{
alert("please enter a username");
document.getElementById('username').focus();
return false;
}
if(document.getElementById('password').value=='')
{
alert("please enter a password");
document.getElementById('password').focus();
return false;
}
if(document.getElementById('email').value=='')
{
alert("please enter a email");
document.getElementById('email').focus();
return false;
}
if(document.getElementById('address').value=='')
{
alert("please enter a address");
document.getElementById('address').focus();
return false;
}
return true;
}
</script>
</head>
<body>
<form action="login.html"method="post" onsubmit="return validate()";>
<table width="50%"border="1">
<tr>
<td>
<table width="50%" border="0" align="center" class="margin">
<tr>
<td colspan="2" align="center">REGISTRATION</td>
</tr>
<tr>
<td>NAME:</td>
<td><input type="text" name="name" id="name" size="20"></td>
</tr>
<tr>
<td>USERNAME:</td>
<td><input type="text" name="username" id="username" size="20"></td>
</tr>
<tr>
<td>PASSWORD:</td>
<td><input type="text" name="password" id="password" size="20"></td>
</tr>
<tr>
<td>EMAIL:</td>
<td><input type="text" name="email" id="email" size="20"></td>
</tr>
<tr>
<td>ADDRESS:</td>
<td valign="top"><textarea rows="10" cols="20" name="address" id="address"></textarea></td>
</tr>
<tr>
<td align="center"><input type="submit" name="submit" id="submit"value="register"></td>

</tr>
</form>
</table>
</table>
</body>
</html>

Monday, 7 January 2013

Javascript validation for Email Address

Javascript is used for validating the Email address. The syntax is as follows:
<html>
<head>
<script language = "Javascript">
/**
 * DHTML email validation script. Courtesy of SmartWebby.com (http://www.smartwebby.com/dhtml/)
 */

function echeck(str) {

var at="@"
var dot="."
var lat=str.indexOf(at)
var lstr=str.length
var ldot=str.indexOf(dot)
if (str.indexOf(at)==-1){
  alert("Invalid E-mail ID")
  return false
}

if (str.indexOf(at)==-1 || str.indexOf(at)==0 || str.indexOf(at)==lstr){
  alert("Invalid E-mail ID")
  return false
}

if (str.indexOf(dot)==-1 || str.indexOf(dot)==0 || str.indexOf(dot)==lstr){
   alert("Invalid E-mail ID")
   return false
}

if (str.indexOf(at,(lat+1))!=-1){
   alert("Invalid E-mail ID")
   return false
}

if (str.substring(lat-1,lat)==dot || str.substring(lat+1,lat+2)==dot){
   alert("Invalid E-mail ID")
   return false
}

if (str.indexOf(dot,(lat+2))==-1){
   alert("Invalid E-mail ID")
   return false
}

if (str.indexOf(" ")!=-1){
   alert("Invalid E-mail ID")
   return false
}

  return true
}

function ValidateForm(){
var emailID=document.frmSample.txtEmail

if ((emailID.value==null)||(emailID.value=="")){
alert("Please Enter your Email ID")
emailID.focus()
return false
}
if (echeck(emailID.value)==false){
emailID.value=""
emailID.focus()
return false
}
return true
 }
</script>
</head>
<body>
<form name="frmSample" method="post" action="#" onSubmit="return ValidateForm()">
                <p>Enter an Email Address : 
                  <input type="text" name="txtEmail">
                </p>
                <p> 
                  <input type="submit" name="Submit" value="Submit">
                </p>
              </form>
 </body>
 </html>

Saturday, 5 January 2013

How to use javascript events in HTML

Javascript has mainly two events that can be used in HTML. They are as follows:

1. onclick Event: The onclick event occurs when the user clicks on an element. The example is as follows:

<!DOCTYPE html>
<html>
<head>
<script>
function changetext(id){
id.innerHTML="Ooooopsss!";
}
</script>
</head>
<body>
<h1 onclick="changetext(this)">Click on this text!</h1>
</body>
</html>

2. onMouseout Event: The onmouseout event occurs when a user moves the mouse pointer out of an element. The example is as follows:

<html>
<head>
<script type="text/javascript">
<!--
function popup(){
alert("Hello World!")}
//-->
</script>
</head>
<body>
<input type="button" value="Click Me!" onclick="popup()"><br/>
<a href="#" onmouseover="" onMouseout="popup()">Hover Me!</a>
</body>
</html>

Thursday, 3 January 2013

How we can register a form

Step1:


First of all we have to make a simple form in HTML by giving Name, Username, Password, Email, Address and next button. The syntax of simple form is as follows:


<html>
<head>
<title>REGISTRATION</title>
<style>
.margin
{
margin-top:100px;
margin-bottom:100px;
margin-left:150px;
margin-left:150px;
}
</style>
</head>
<body>

<form name="registration"action="login.html"method="post">
<table width="50%"border="1">
<tr>
<td>
<table width="50%" border="0" align="center" class="margin">
<tr>
<td colspan="2" align="center">REGISTRATION</td>
</tr>
<tr>
<td>NAME:</td>
<td><input type="text"name="name"size="20"></td>
</tr>
<tr>
<td>USERNAME:</td>
<td><input type="text"name="USERNAME"size="20"></td>
</tr>
<tr>
<td>PASSWORD:</td>
<td><input type="text"name="PASSWORD"size="20"></td>
</tr>
<tr>
<td>EMAIL:</td>
<td><input type="text"name="email"size="20"></td>
</tr>
<tr>
<td>ADDRESS:</td>
<td valign="top"><textarea rows="10"cols="20"name="content"></textarea></td>
</tr>
<tr>
<td align="center"><input type="submit"name="submit"value="next"></td>

</tr>
</form>
</table>
</table>
</body>
</html>

Step2:
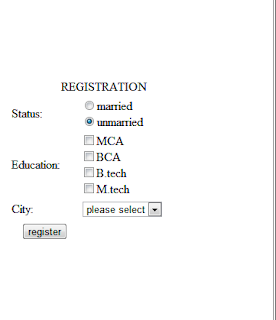
The next step is to make a new page by giving the details whether the person who is filling the form is married or unmarried. His education and the city to which the person belongs to. And at last we have to make a button by giving the button name as register. The example is as follows:

<html>
<head>
<title>REGISTRATION</title>
<style>
.margin
{
margin-top:100px;
margin-bottom:100px;
margin-left:150px;
margin-left:150px;
}
</style>
</head>
<body>

<form name="registration"action="next.html"method="post">
<table width="50%"border="1">
<tr>
<td>
<table width="50%" border="0" align="center" class="margin">
<tr>
<td colspan="2" align="center">REGISTRATION</td>
</tr>
<tr>
<td>Status:</td>
<td><input type="radio"name="status"value="married">married<br>
<input type="radio"name="status"value="unmarried" CHECKED>unmarried</td>
</tr>
<tr>
<td>Education:</td>
<td><input type="checkbox"name="courses"value="MCA">MCA<br>
<input type="checkbox"name="courses"value="BCA">BCA<br>
<input type="checkbox"name="courses"value="B.tech">B.tech<br>
<input type="checkbox"name="courses"value="M.tech">M.tech</td>
</tr>
<tr>
<td>City:</td>
<td><select name="city">
<option value="please select">please select</option>
<option value="Rajpura">Rajpura</option>
<option value="Chandigarh">Chandigarh</option>
<option value="Patiala">Patiala</option>
<option value="Ambala">Ambala</option>
<option value="Mohali">Mohali</option>
<option value="Delhi">Delhi</option>
</td>
</tr>
<td align="center"><input type="submit"name="submit"value="register"></td>

</tr>
</form>
</table>
</table>
</body>
</html>

Step3:

The last step is to make a new page in which I have written that Thanks for Registration!!!. The example is as follows:

<html>
<body>
<h1 align="center">Thanks for Registration!!!</h1>
</body>
</html>