How we can register a form
Step1:
First of all we have to make a simple form in HTML by giving Name, Username, Password, Email, Address and next button. The syntax of simple form is as follows:
<html>
<head>
<title>REGISTRATION</title>
<style>
.margin
{
margin-top:100px;
margin-bottom:100px;
margin-left:150px;
margin-left:150px;
}
</style>
</head>
<body>
<form name="registration"action="login.html"method="post">
<table width="50%"border="1">
<tr>
<td>
<table width="50%" border="0" align="center" class="margin">
<tr>
<td colspan="2" align="center">REGISTRATION</td>
</tr>
<tr>
<td>NAME:</td>
<td><input type="text"name="name"size="20"></td>
</tr>
<tr>
<td>USERNAME:</td>
<td><input type="text"name="USERNAME"size="20"></td>
<tr>
<td>PASSWORD:</td>
<td><input type="text"name="PASSWORD"size="20"></td>
</tr>
<tr>
<td>EMAIL:</td>
<td><input type="text"name="email"size="20"></td>
</tr>
<tr>
<td>ADDRESS:</td>
<td valign="top"><textarea rows="10"cols="20"name="content"></textarea></td>
</tr>
<tr>
<td align="center"><input type="submit"name="submit"value="next"></td>
</tr>
</form>
</table>
</table>
</body>
</html>
Step2:
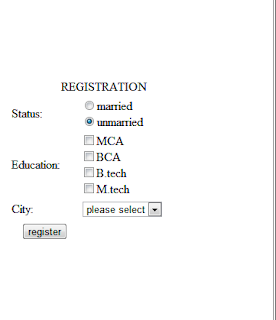
 The next step is to make a new page by giving the details whether the person who is filling the form is married or unmarried. His education and the city to which the person belongs to. And at last we have to make a button by giving the button name as register. The example is as follows:
<html>
<head>
<title>REGISTRATION</title>
<style>
.margin
{
margin-top:100px;
margin-bottom:100px;
margin-left:150px;
margin-left:150px;
}
</style>
</head>
<body>
<form name="registration"action="next.html"method="post">
<table width="50%"border="1">
<tr>
<td>
<table width="50%" border="0" align="center" class="margin">
<tr>
<td colspan="2" align="center">REGISTRATION</td>
</tr>
<tr>
<td>Status:</td>
<td><input type="radio"name="status"value="married">married<br>
<input type="radio"name="status"value="unmarried" CHECKED>unmarried</td>
</tr>
<tr>
<td>Education:</td>
<td><input type="checkbox"name="courses"value="MCA">MCA<br>
<input type="checkbox"name="courses"value="BCA">BCA<br>
<input type="checkbox"name="courses"value="B.tech">B.tech<br>
<input type="checkbox"name="courses"value="M.tech">M.tech</td>
</tr>
<tr>
<td>City:</td>
<td><select name="city">
<option value="please select">please select</option>
<option value="Rajpura">Rajpura</option>
<option value="Chandigarh">Chandigarh</option>
<option value="Patiala">Patiala</option>
<option value="Ambala">Ambala</option>
<option value="Mohali">Mohali</option>
<option value="Delhi">Delhi</option>
</td>
</tr>
<td align="center"><input type="submit"name="submit"value="register"></td>
</tr>
</form>
</table>
</table>
</body>
</html>
Step3:
The last step is to make a new page in which I have written that Thanks for Registration!!!. The example is as follows:
<html>
<body>
<h1 align="center">Thanks for Registration!!!</h1>
</body>


No comments:
Post a Comment